
Frustrated by seeing your precise designs fail on the shop floor due to a simple snapped tap? This article introduces a proven DfM framework for tapping design that moves beyond basic charts, empowering you to eliminate manufacturing errors at the source for predictable costs and profitable projects.
Critical tapping design mistakes include using excessive thread engagement which dramatically increases torque and causes tap breakage; designing blind holes without sufficient chip clearance leading to tool failure; and ignoring material work-hardening properties, resulting in catastrophic failure in hard materials.
But spotting these common errors is only half the battle. The real challenge lies in applying the decision-making framework that senior engineers use to balance thread strength against manufacturing risk for any given material.
Continue reading to learn this systematic approach—a mindset that moves beyond simple rules to give you predictable control over your outcomes.
Why You Must Stop Chasing 100% Thread Engagement

One of the most pervasive myths in mechanical design, especially among those new to Design for Manufacturing (DFM), is the belief that a stronger part requires 100% thread engagement.
It seems logical: more thread contact should equal more strength. But in the real world of machining, this pursuit is not only unnecessary—it’s the direct cause of catastrophic tap failures.
The Power of Thread Engagement Percentage
Thread engagement percentage defines how much of the internal thread form makes contact with the external thread (the bolt). The critical insight is that the relationship between this percentage, thread strength, and the torque required to tap the hole is not linear. It’s a relationship of sharply diminishing returns.
Consider this data, which should fundamentally change how you approach thread design:
- Increasing thread engagement from 50% to 75% nearly doubles the required tapping torque.
- Pushing from 75% to 100% engagement triples the torque again.
Now, here’s the crucial trade-off: a thread at 75% engagement is already providing 95% of the full strength of a 100% engaged thread. You are subjecting the tap to three times the stress for a negligible 5% gain in strength.
This is an engineering trade-off that is almost never worth it. As CNC machining expert Bob Warfield, founder of CNC Cookbook, consistently points out, sticking to a lower engagement percentage is one of the easiest and most effective ways to prevent breaking taps.
The Right Way to Calculate Your Tap Drill Size
This brings us to the tap drill hole. Establishing precise pilot holes with our CNC drilling is critical. The common formula Drill Size = Nominal Diameter - Pitch is a trap; it calculates a hole size for nearly 100% engagement. You must discard it.
Ensuring the tap drill hole is executed with absolute precision is the critical first step. Our Precision CNC Drilling Services are designed for this exact challenge.
Instead, a professional approach involves calculating your drill size based on a target engagement percentage. Use this formula to design for success:
Tap Drill Diameter = Nominal Diameter – (1.0825 x Pitch x Target %)
To make this immediately actionable, here is a framework you can apply to your designs. Think of it not as a rigid chart, but as a decision-making tool for balancing strength and manufacturability.
| Material Type | Recommended Thread Engagement % | Design Rationale |
|---|---|---|
| Hard Materials (Stainless Steel, Titanium, Inconel) | 55% – 65% | These materials work-harden rapidly. Lowering torque is your #1 priority to prevent tap breakage. |
| General Purpose Steels (Low-Carbon, Alloy Steel) | 65% – 75% | This is the sweet spot, providing excellent strength with a manageable and safe level of tapping torque. |
| Soft & Ductile Materials (Aluminum, Brass, Copper) | 75% – 80% | The material is forgiving, so a higher engagement can be used to ensure maximum strength without significant risk. |
By consciously choosing a lower, smarter engagement percentage, you are moving from a passive designer who simply follows a chart to an active engineer who strategically controls risk and cost.
Your Tapping Design Playbook: 5 Rules for Your Pre-Release Checklist
Knowing the theory is one thing; applying it consistently is what separates a good engineer from a great one. The following five rules are designed to be a practical, actionable checklist you can run through before releasing any design with tapped holes.
-
Master the “Space” Within a Blind Hole
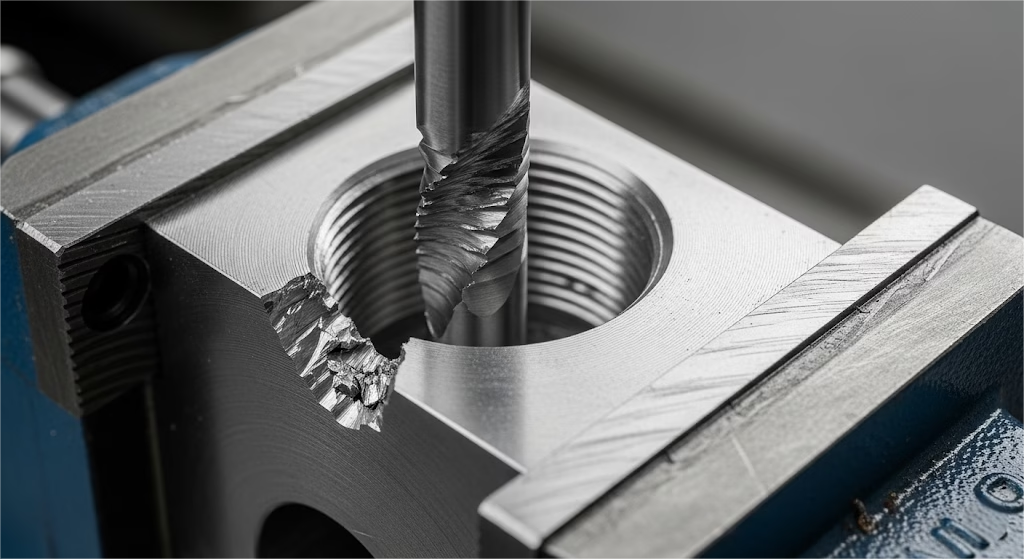
When working with a blind hole (one that doesn’t go all the way through the part), two easily overlooked geometric features become critical for success.
- The Lead-In Chamfer: A small chamfer at the mouth of the hole isn’t just for deburring. It acts as a crucial funnel, guiding the tap precisely into the hole, reducing entry torque, and preventing the threads from being stripped at the start.
- Actionable Rule: Design a lead-in chamfer with a diameter 0.2mm to 0.4mm larger than the thread’s major diameter.
- The Bottom Clearance: A tap needs room at the bottom of a blind hole to accommodate both the tool’s tapered point and the chips it produces. Without this space, chips will pack tightly, jamming the tap and causing it to break.
- Actionable Rule: Design the total hole depth to be the required effective thread depth plus at least 4x the thread’s pitch for clearance. For an M5x0.8 thread, that’s an extra 3.2mm of depth.
- The Lead-In Chamfer: A small chamfer at the mouth of the hole isn’t just for deburring. It acts as a crucial funnel, guiding the tap precisely into the hole, reducing entry torque, and preventing the threads from being stripped at the start.
-
Customize Your Strategy by Material: Aluminum vs. Stainless Steel
Treating all materials the same is a recipe for failure. A design that works perfectly in aluminum will almost certainly fail in stainless steel. You must adapt your strategy.
- For Aluminum & Ductile Materials: Aluminum is “gummy” and its chips can easily clog a tap. However, its ductility makes it a perfect candidate for form tapping (also called roll tapping).
This process displaces material instead of cutting it. This creates stronger threads, produces zero chips, and dramatically reduces the risk of breakage, making it the superior choice for blind holes in these materials.
- For Stainless Steel & Hard Materials: Stainless steel is notorious for work hardening—it becomes significantly harder as it’s being machined. This generates immense heat and torque. For these materials, you must use a low thread engagement (55-65%), ensure excellent lubrication, and your drawing should implicitly demand a tap with a high-performance coating (like TiAlN) designed for these conditions.
-
Respect Physics: The Minimum Safe Wall Thickness
Tapping exerts outward radial force on the hole. If the surrounding wall is too thin, it can bulge or even crack, compromising the entire part.
- Actionable Rule: Ensure the minimum wall thickness around your tapped hole is at least equal to the nominal diameter of the thread (1D), and ideally 1.5x the diameter (1.5D) for any structural or critical applications.
-
“Speak Machinist” on Your Engineering Drawing
Your drawing is a direct communication tool with the shop floor. Use it to eliminate ambiguity and showcase your DFM expertise. Instead of just noting “M6 THREAD,” a more expert instruction for an aluminum part would be “M6x1.0 ROLLED THREAD (FORM TAP RECOMMENDED).” This single note signals to the machinist that you have considered the best process, empowering them to use a superior method and reducing the chance of error.
-
Acknowledge the Hidden Variable: The Actual Hole Size
Finally, even with perfect calculations, failure can still occur. Why? The root cause is often the hole itself. A worn or poorly ground drill bit can easily produce a hole that is slightly undersized.
An incorrect hole size is the single most common cause of tap failure.
This deviation from your design intent can be enough to spike the torque and break the tap. While you can’t control the tool wear, specifying the correct hole size and its tolerance on your drawing is your primary defense.
Think of these five points as the core of a professional design checklist. Applying them consistently will move your designs from being a source of potential problems to a model of manufacturability.
When Should You Strategically Abandon Tapping for Thread Milling?
For many designers, tapping is the default method for creating internal threads. A seasoned expert, however, views it as just one option in a larger toolkit. Thread milling is not merely a replacement; it is a strategic tool for risk management.
Instead of being a binary choice, your decision to use tapping versus thread milling should be based on a detailed risk/reward calculation.
Thread milling is a slower process, but it is inherently safer. A thread mill is far less likely to break catastrophically, and if it does, it typically doesn’t get jammed in the part, making salvage easy.
So, when should you specify thread milling on your drawing? Here is a simple decision model. If your part meets any of the following criteria, you should strongly consider thread milling as the default, safer choice:
- Is the part high-value? When the value of the machined part itself exceeds $1,000, the added cost of a slower machining process is cheap insurance against a total loss.
- Is the material difficult or exotic? For materials like Inconel, hardened steels, or titanium, the machining window is extremely narrow. Thread milling provides a much greater degree of control and a lower risk of failure.
- Is the thread diameter large or non-standard? For threads larger than M24, or for custom profiles like multi-start or fine-pitch threads, a single thread mill offers far more flexibility and reliability than a large, expensive, and fragile tap.
- Is it a thin-walled application? The radial cutting forces in thread milling are significantly lower than in tapping, drastically reducing the risk of deforming or cracking thin-walled features.
Actively choosing thread milling in these situations demonstrates a higher level of thinking. It shows you are not just designing a feature; you are managing the entire manufacturing process, balancing cost, risk, and quality to achieve the best possible outcome.
From the Shop Floor: A Cautionary Tale of a $6,000 Mistake

Theory and data are powerful, but some lessons are only truly learned through costly experience. Let me share a story from a real-world project that perfectly illustrates how a design that is “correct on paper” can go catastrophically wrong in production.
We were developing a high-precision housing for a drone sensor, machined from a block of 7075-T6 aluminum. The design featured twelve M3 blind holes to secure the internal PCB.
Our initial design, created by a diligent young engineer, followed the standard tap drill chart, specifying a ø2.5mm hole for the M3x0.5 thread. This equated to a standard 75% thread engagement—a textbook-perfect specification.
The result was a disaster.
During the first production run, the M3 taps began snapping with alarming frequency. By the time we had machined the third part, we had broken four taps.
Because the breakage occurred deep inside nearly finished components, two of the $3,000 housings had to be scrapped. The production line halted, trust between the design and manufacturing teams frayed, and the project timeline was suddenly at risk.
The painful lesson was the critical gap between theory and reality. While 7075-T6 is an aluminum alloy, it is significantly harder and more prone to work-hardening than its more common 6061 counterpart. For a small M3 tap in a blind hole, the standard 75% engagement generated fatal levels of torque.
The solution was a multi-faceted fix born from this expensive failure:
- Optimized Design Parameters: We revised the drawing, increasing the hole diameter from ø2.5mm to ø2.6mm. This tiny 0.1mm change reduced the thread engagement to approximately 62%, drastically lowering the torque. For a non-structural PCB mount, the slight reduction in pull-out strength was irrelevant.
- Increased Chip Clearance: We deepened the blind hole to provide 4.5mm of clearance at the bottom, giving chips more room to accumulate without packing.
- Specified the Right Tool: Most importantly, our process sheet now explicitly called for a spiral flute forming tap. This eliminated the chip problem entirely and created stronger, work-hardened threads.
The result? We subsequently produced over 100 units with zero tap failures and zero scrap. We share this story not to place blame, but to demonstrate that true expertise lies in understanding not just the rules, but the context in which they apply.
This experience, which cost us over $6,000, is now a core part of our design DNA—and we hope it now becomes part of yours.
Tapping Design Failure: Quick Diagnosis Chart
| The Problem | Root Cause in Design | Design Solution | Costly Consequence |
|---|---|---|---|
| Broken Taps | Excessive Thread Engagement (>75%) | Target 55-75% Engagement | Part Scrap, Machine Downtime |
| Blind Hole Failure | Insufficient Chip Clearance / Chamfer | Add Clearance (≥4P) & Chamfer | Tap Breakage Inside Part |
| Poor Thread Quality | Wrong Material Strategy | Use Form Taps / Lower Engagement | Work Hardening, Assembly Failure |
| Wall Deformation/Cracking | Insufficient Wall Thickness | Wall Thickness ≥ 1.5x Diameter | Compromised Part Integrity |
So, What’s the Next Question You Should Be Asking?
Having mastered the principles of designing for internal tapping, a forward-thinking engineer like you might naturally wonder: “How do these concepts apply to creating external threads?”
While the tools are different (a die for manual threading or single-point threading on a lathe), the core engineering philosophy is identical. The goal is always to manage cutting forces, respect the material’s properties, and reduce stress on the tool and workpiece. Principles like ensuring proper lubrication, providing relief grooves where a thread ends, and understanding how material work-hardens are just as critical when cutting threads on the outside of a part.
The mindset you’ve developed throughout this guide—of proactively designing for manufacturability—is a universal asset that will make you a more effective engineer across all processes.
Conclusion: From Design Engineer to Manufacturing Partner
Let’s revisit where we started: with the gut-wrenching sound of a tap snapping in an almost-finished part. That sound represents more than just a financial loss; it represents a gap between design intent and manufacturing reality. By reaching the end of this guide, you have armed yourself with the knowledge to close that gap for good.
You now understand that the secret to successful thread design isn’t about blind adherence to charts, but about active, intelligent decision-making.
- You know that controlling thread engagement is your most powerful lever for managing risk.
- You know that the details of geometry—the chamfers and clearances—are just as important as the thread itself.
- And most importantly, you have learned to think like a machinist—adapting your strategy for the material and anticipating the physical forces at play.
This approach transforms you from being just a designer of parts to a true partner in the manufacturing process. The principles of designing for tapping are a perfect example of how thoughtful, proactive DFM is the single most effective way to save time, reduce cost, and build a reputation for excellence.


